
Aetertek AT-919C-1
Aetertek AT-919C-1 Remote Dog Training Collar User Manual
1. Uvod
Thank you for choosing the Aetertek AT-919C-1 Remote Dog Training Collar. This manual provides essential information for the safe and effective use of your new training system. This system is designed to assist in training and behavior modification for medium to large dogs, offering remote control over sound, vibration, and static correction modes, along with an automatic anti-bark function. Please read this manual thoroughly before operating the device.

Image 1.1: Aetertek AT-919C-1 Remote Dog Training Collar components.
2. Vsebina paketa
Preverite, ali so v vašem paketu priloženi vsi spodaj navedeni elementi:
- 1 x daljinski oddajnik
- 1 x Receiver Collar (for 1-Dog Kit)
- 1 x Nastavljiv ovratnik
- 1 x Dual-Head Charging Cable
- 1 x Set of Long Contact Points
- 1 x Set of Short Contact Points
- 1 x orodje za preskusno lučko
- 1 x Uporabniški priročnik (ta dokument)

Image 2.1: All components included in the 1-Dog Kit.
3. Izdelek je končanview
3.1 Remote Transmitter
- LCD zaslon: Shows battery level, intensity level, and selected dog.
- Gumbi načina: Separate buttons for Sound, Vibration, and Static Correction.
- Prilagoditev intenzivnosti: Buttons to increase or decrease correction levels.
- Dog Selection Button: Switch between Dog 1 and Dog 2 (if using a 2-dog system).
- Magnetic Induction Power Switch: For turning the remote on/off.
- Sponka za pas: Za priročno nošenje.

Image 3.1: Remote Transmitter layout.
3.2 Ovratnica sprejemnika
- Kontaktne točke: Deliver static correction and vibration. Choose long or short based on dog's coat.
- Magnetic Induction Power Switch: For turning the receiver on/off.
- Vrata za polnjenje: For recharging the receiver battery.
- Vodotesna zasnova: 100% waterproof and submersible.
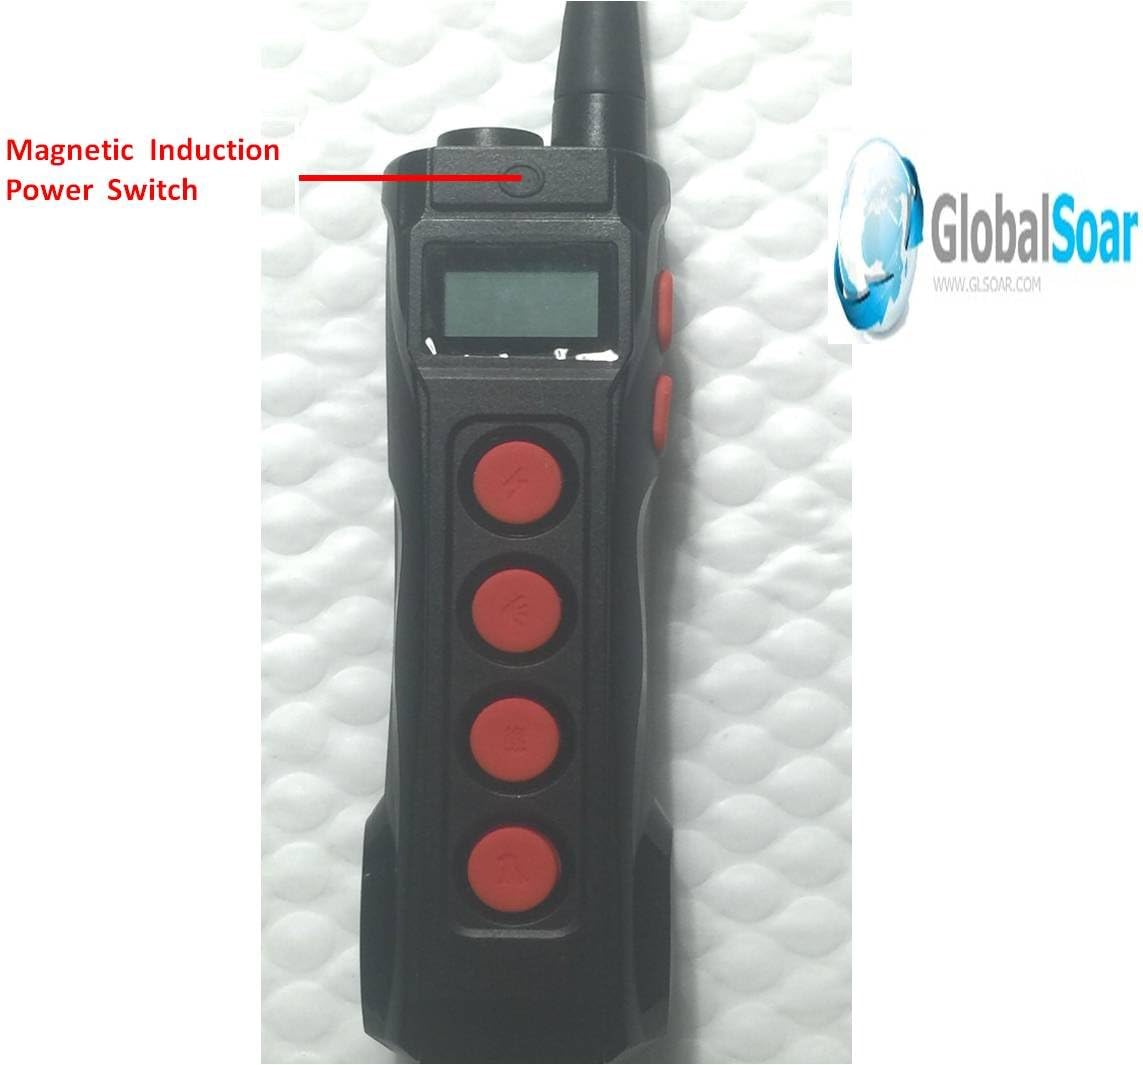
Image 3.2: Receiver Collar with magnetic induction power switch.

Image 3.3: Remote and Receiver Collar connection points.
4. Nastavitev
4.1 Polnjenje naprav
- Connect the dual-head charging cable to both the Remote Transmitter and the Receiver Collar.
- Priključite USB konec kabla v standardni USB napajalnik (ni priložen) ali USB vrata računalnika.
- Allow both devices to charge fully before first use. The indicator lights will change to show charging status (refer to specific light indicators in the full manual for details).

Image 4.1: Receiver Collar charging port.
4.2 Attaching Contact Points
Select the appropriate length of contact points (long or short) based on your dog's coat thickness. The contact points must make direct contact with your dog's skin for effective correction.
- For dogs with short coats, use the shorter contact points.
- For dogs with thick or long coats, use the longer contact points.
4.3 Vklop/izklop in seznanjanje
- To power on the Remote Transmitter and Receiver Collar, hold the magnetic induction power switch on each device until the indicator light illuminates.
- To power off, repeat the process until the indicator light turns off.
- The devices are typically pre-paired. If re-pairing is needed (e.g., after a full discharge or adding a second collar), follow the specific pairing instructions in the full manual. Generally, this involves holding a button on the receiver while the remote is in pairing mode.
5. Načini delovanja
The Aetertek AT-919C-1 offers three distinct training modes: Sound, Vibration, and Static Correction. These can be used independently or in combination to achieve desired training outcomes.
5.1 Sound (Beep) Mode
- Use the dedicated Sound button on the remote.
- There are 10 adjustable beep sound levels. Start with a low level and increase as needed.
- Ideal for issuing warnings, calling your dog, or reinforcing positive behavior.
5.2 Način vibriranja
- Activate using the dedicated Vibration button on the remote.
- This mode offers 1 strong and humane vibration level.
- Effective for gaining your dog's attention or as a stronger warning than the sound mode.
5.3 Static Correction (Shock) Mode
- Engage with the dedicated Static Correction button on the remote.
- Features 10 levels of progressive static correction, adjusting both intensity and duration.
- Always start at the lowest level and gradually increase only if necessary. Use this mode for serious behavior issues that other modes have not corrected.
5.4 Automatic Anti-Bark Function
- The receiver collar includes an automatic anti-bark feature.
- This function can be switched ON or OFF as desired. Refer to the full manual for specific instructions on activating/deactivating this feature.
5.5 Dog Selection
If you have purchased a 2-Dog Kit or an additional receiver collar, you can switch between controlling Dog 1 and Dog 2 using the dedicated dog selection button on the remote transmitter.
6. Namestitev ovratnika
Proper fit of the receiver collar is crucial for its effectiveness and your dog's comfort and safety.
- Position the receiver on the center of your dog's neck, directly under the chin.
- Ensure the contact points are touching your dog's skin. You may need to part thick fur to ensure good contact.
- The collar should be snug, but not too tight. You should be able to fit two fingers snugly between the collar strap and your dog's neck.
- Avoid leaving the collar on for more than 12 hours a day to prevent skin irritation.
7. Nasveti za usposabljanje
Effective training requires consistency, patience, and positive reinforcement. The Aetertek training collar is a tool to aid in this process, not a substitute for proper training techniques.
- Start with Basic Commands: Ensure your dog understands basic commands like 'sit', 'stay', and 'come' before introducing the collar for correction.
- Pozitivna okrepitev: Always reward desired behaviors with praise, treats, or affection.
- Doslednost je ključna: Use the collar consistently for specific behaviors you want to correct.
- Low Levels First: Always begin with the lowest effective correction level and only increase if necessary.
- Kratke vadbene seje: Treningi naj bodo kratki in pozitivni, da ohranite angažiranost svojega psa.

Slika 7.1: Primeramples of well-behaved dogs after training.
Video 7.1: Dog Training Collar with 3 Training Modes. This video demonstrates the use of a dog training collar with sound, vibration, and static correction modes, showing how to adjust levels and apply corrections for effective training.
8. Vzdrževanje
- Čiščenje: Redno čistite ovratnik sprejemnika in kontaktne točke z oglasnimamp cloth. Ensure all components are dry before storage or next use.
- Skin Check: Inspect your dog's neck daily for any signs of irritation or sores from the contact points. If irritation occurs, discontinue use until the skin heals.
- Vzdrževanje baterije: Fully charge the devices when not in use for extended periods to prolong battery life.
9. Odpravljanje težav
- Brez napajanja: Ensure both the remote and receiver are fully charged. Check the charging cable and adapter.
- No Correction: Verify the receiver is powered on and the contact points are making proper skin contact. Increase the intensity level gradually.
- Remote Not Controlling Receiver: Re-pair the remote and receiver according to the full manual's instructions. Ensure they are within the specified range.
- Dog Not Responding: Check the collar fit and ensure the correction level is appropriate for your dog's temperament and the situation. Re-evaluate training methods.
10. Specifikacije
- Številka modela: AT-919C-1
- Znamka: Aetertek
- Teža artikla: 1.06 funtov
- Razpon: Do 1100 jardov (približno 1000 metrov)
- Vodoodporen: 100% Waterproof and Submersible Receiver Collar
- Vrsta baterije: Litijev polimer (vključen)
- Načini vadbe: Sound (Beep), Vibration, Static Correction
- Stopnje šoka: 10 progressive levels (intensity and duration adjustable)
- Nivo vibracij: 1 level (strong and humane)
- Beep Levels: 10 nastavljive ravni
- Auto Anti-Bark: Yes (ON/OFF switchable)
- Material: Metal, Polyurethane
- Ciljna publika: Srednje veliki do veliki psi
11. Garancija in podpora
For warranty information, technical support, or any questions regarding your Aetertek AT-919C-1 Remote Dog Training Collar, please refer to the contact information provided in your product packaging or visit the official Aetertek webspletnega mesta. Račun shranite kot dokazilo o nakupu za uveljavljanje garancije.
Ask a question about this manual
Ask about setup, troubleshooting, compatibility, parts, safety, or missing instructions. Manuals+ will review the question and use this page’s manual context to help answer it.