
1. Izdelek je končanview
The HP ProDisplay P17A is a 17-inch LED-backlit LCD monitor designed for general computing tasks. It features a 5:4 aspect ratio with a maximum resolution of 1280 x 1024 pixels, providing clear and consistent visuals. This monitor is equipped with both VGA and HDMI connectivity options, offering versatility for various system configurations. Its compact design and energy-efficient LED backlighting make it suitable for a range of environments.

Slika 1: Spredaj view of the HP ProDisplay P17A monitor, showcasinnjegov zaslon in stojalo.
2. Navodila za nastavitev
2.1 Odpakiranje monitorja
Previdno vzemite vse komponente iz embalaže. Prepričajte se, da so prisotni naslednji elementi:
- HP ProDisplay P17A Monitor
- Monitor Stand (base and neck)
- Napajalni kabel
- VGA Cable (may vary by region/package)
- HDMI Cable (may vary by region/package)
2.2 Sestavljanje stojala
- Monitor postavite z zaslonom navzdol na mehko, čisto površino, da preprečite praske.
- Attach the stand neck to the back of the monitor, aligning the tabs and pushing until it clicks into place.
- Attach the stand base to the bottom of the stand neck, securing it with the captive screw if present.
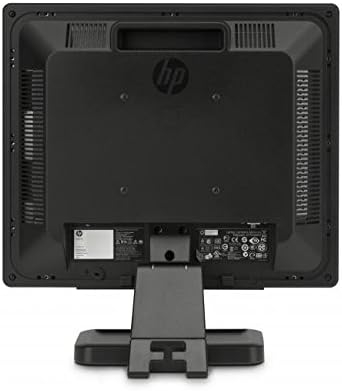
Slika 2: Zadaj view of the monitor, illustrating the stand attachment point and various connectivity ports.
2.3 Povezovalni kabli
- Napajalni priključek: Napajalni kabel priključite na vhod za napajanje monitorja in nato na ozemljeno električno vtičnico.
- Video povezava:
- For VGA: Connect one end of the VGA cable to the VGA port on the monitor and the other end to the VGA port on your computer. Tighten the screws on the VGA connector.
- For HDMI: Connect one end of the HDMI cable to the HDMI port on the monitor and the other end to the HDMI port on your computer.
- Zagotovite, da so vse povezave varne.
3. Navodila za uporabo
3.1 Vklop/izklop
Press the power button located on the front bezel of the monitor to turn it on or off. The power indicator light will illuminate when the monitor is on.
3.2 Adjusting Display Settings (OSD Menu)
The On-Screen Display (OSD) menu allows you to adjust various monitor settings. Use the buttons on the front bezel to navigate and select options.
- Gumb menija: Odpre OSD meni.
- Navigacijski gumbi (+ / - or Up/Down): Move through menu options and adjust values.
- Gumb Izberi/V redu: Potrdi izbiro ali odpre podmeni.
- Gumb za izhod: Zapre trenutni meni ali zaslonski meni.
Pogoste nastavljive nastavitve vključujejo:
- Svetlost/kontrast: Adjusts the overall luminance and difference between light and dark areas.
- Barvni nadzor: Allows adjustment of color temperature, RGB levels, or preset color modes.
- Izbira vnosa: Manually switches between VGA and HDMI input sources.
- Nadzor slike: Adjusts sharpness, aspect ratio, and auto-adjustment for analog signals.
- Upravljanje: Power-saving options, OSD timeout, language selection.
4. Vzdrževanje
4.1 Čiščenje monitorja
- Pred čiščenjem vedno izklopite monitor in izvlecite napajalni kabel.
- Narahlo uporabite mehko krpo, ki ne pušča vlaken dampz vodo ali neabrazivnim čistilom za zaslone.
- Do not spray cleaner directly onto the screen or monitor casing.
- Avoid using benzene, thinner, ammonia-based cleaners, or abrasive materials, as these can damage the surface.
4.2 Splošna nega
- Izogibajte se postavljanju monitorja na neposredno sončno svetlobo ali v bližino virov toplote.
- Zagotovite zadostno prezračevanje okoli monitorja.
- Ne blokirajte prezračevalnih odprtin.
- Zaslon zaščitite pred ostrimi predmeti ali prekomernim pritiskom.
5. Odpravljanje težav
Before contacting support, try the following basic troubleshooting steps:
5.1 Ni slike na zaslonu
- Ensure the monitor's power cable is securely connected to both the monitor and a working electrical outlet.
- Verify the power indicator light on the monitor is on. If not, press the power button.
- Check that the video cable (VGA or HDMI) is securely connected to both the monitor and the computer.
- Ensure the correct input source is selected on the monitor (use the OSD menu to switch inputs).
- Znova zaženite računalnik.
5.2 Slaba kakovost slike
- Nejasna ali zamegljena slika: Prepričajte se, da je ločljivost zaslona v računalniku nastavljena na izvorno ločljivost monitorja (1280 x 1024).
- Napačne barve: Adjust color settings through the OSD menu or your computer's display settings.
- Image Off-Center/Incorrect Size (VGA only): Use the "Auto Adjust" function in the OSD menu.
- Utripanje: Check the refresh rate setting on your computer; ensure it is set to 60 Hz.
5.3 Monitor Not Responding to Buttons
- Unplug the monitor's power cable, wait 10 seconds, then plug it back in and try again.
- Prepričajte se, da noben gumb ni zataknjen.
6. Tehnične specifikacije
| Funkcija | Specifikacija |
|---|---|
| Znamka | HEWLETT PACKARD |
| Ime modela | HP P17A |
| Številka modela | F4M97AAABA |
| Velikost zaslona | 17 palcev |
| Vrsta zaslona | LCD z osvetlitvijo LED |
| Izvorna ločljivost | 1280 x 1024 (SXGA) |
| Razmerje stranic | 5:4 |
| Kontrastno razmerje | 1000:1 |
| Hitrost osveževanja | 60 Hz |
| Odzivni čas | 5 milisekund |
| Viewkota | 170 stopinj |
| Povezljivost | 1x VGA, 1x HDMI |
| Poraba energije | 25 W (največ) |
| Mere predmeta (D x Š x V) | 8.12"D x 14.85"Š x 15.24"V |
| Teža predmeta | 8.2 funta |
| Vrsta namestitve | Stenski nosilec (združljiv z VESA) |
| Dodatne funkcije | Zaslon proti bleščanju |

Figure 3: Dimensions of the HP ProDisplay P17A monitor.
7. Garancija in podpora
7.1 Informacije o garanciji
This product is often sold as a refurbished item. Refurbished products typically come with a limited warranty provided by the refurbisher or seller. Please refer to your purchase documentation for specific warranty terms and conditions, including duration and coverage details.
7.2 Tehnična podpora
For technical assistance, troubleshooting beyond this manual, or warranty claims, please contact the vendor or HP customer support. Have your monitor's model number (F4M97AAABA) and serial number ready when contacting support.
You can find additional support resources, drivers, and documentation on the official HP support webmesto.