
1. Uvod
This manual provides comprehensive instructions for the installation, operation, and maintenance of your LUX Pro PSD010B Mechanical Non-Programmable Thermostat. This thermostat is designed for use with 1 Heat Only systems, including fireplaces, stoves, and in-floor radiant heating. It does not require a fan switch and is battery-powered for reliable operation.

Slika 1.1: Spredaj view of the LUX Pro PSD010B Thermostat, displaying a temperature of 72 degrees Fahrenheit on its digital screen, along with up and down arrow buttons for temperature adjustment.

Slika 1.2: The LUX Pro PSD010B Thermostat mounted on a wall in a contemporary living room, demonstrating its discreet integration into a home environment.
2. Varnostne informacije
- Always turn off power to the heating system at the main fuse or circuit breaker panel before installing or servicing the thermostat.
- Ta termostat je zasnovan za nizke volumnetage (24V) heating systems or millivolt systems. Do not use with line voltagsistemi (120 V/240 V).
- Prepričajte se, da so vse električne povezave varne in v skladu z lokalnimi električnimi predpisi.
- Baterije zavrzite v skladu z lokalnimi predpisi. Baterij ne sežigajte.
3. Vsebina paketa
Preverite, ali vaš paket vsebuje naslednje elemente:

Slika 3.1: Visual representation of the items included in the product box: the PSD010B thermostat, two AA LR6 batteries, two ST screws, two wall anchors, and wire labels.
- LUX Pro PSD010B Thermostat
- 2 AA LR6 Batteries
- 2 Mounting Screws (ST screws)
- 2 stenska sidra
- Žične nalepke
- Navodila za uporabo (ta dokument)
4. Namestitev
4.1 Kontrolni seznam pred namestitvijo
- Ensure your heating system is compatible (see Section 6: System Compatibility).
- Gather necessary tools: Phillips screwdriver, wire strippers (if needed), drill (if installing wall anchors).
- Turn off power to your heating system at the circuit breaker or fuse box.
4.2 Odstranjevanje starega termostata
- Turn off the power to your heating system.
- Odstranite pokrov starega termostata.
- Note the wire connections. This thermostat is designed for 2-wire heat-only systems. Label the wires (e.g., R and W) using the provided wire labels.
- Odklopite žice in odstranite staro podnožje termostata s stene.
4.3 Montaža novega termostata
- Ločite sprednji pokrov od podnožja termostata.
- Position the thermostat base on the wall where the old thermostat was located. Ensure it is level.
- Mark the mounting holes. If new holes are required, drill pilot holes and insert wall anchors if mounting into drywall.
- Podnožje termostata pritrdite na steno s priloženimi vijaki.
4.4 Ožičenje
The PSD010B is compatible with 2-wire heat-only systems. Connect the wires from your heating system to the terminals on the thermostat base. Typically, these are R (power) and W (heat call) wires. Ensure connections are tight.
4.5 Namestitev baterije
- Insert the two AA batteries into the battery compartment on the back of the thermostat, observing the correct polarity (+/-).
- Namestite sprednji pokrov na podstavek termostata.
- Restore power to your heating system at the main fuse or circuit breaker panel.
5. Delovanje
5.1 Display and Controls Overview
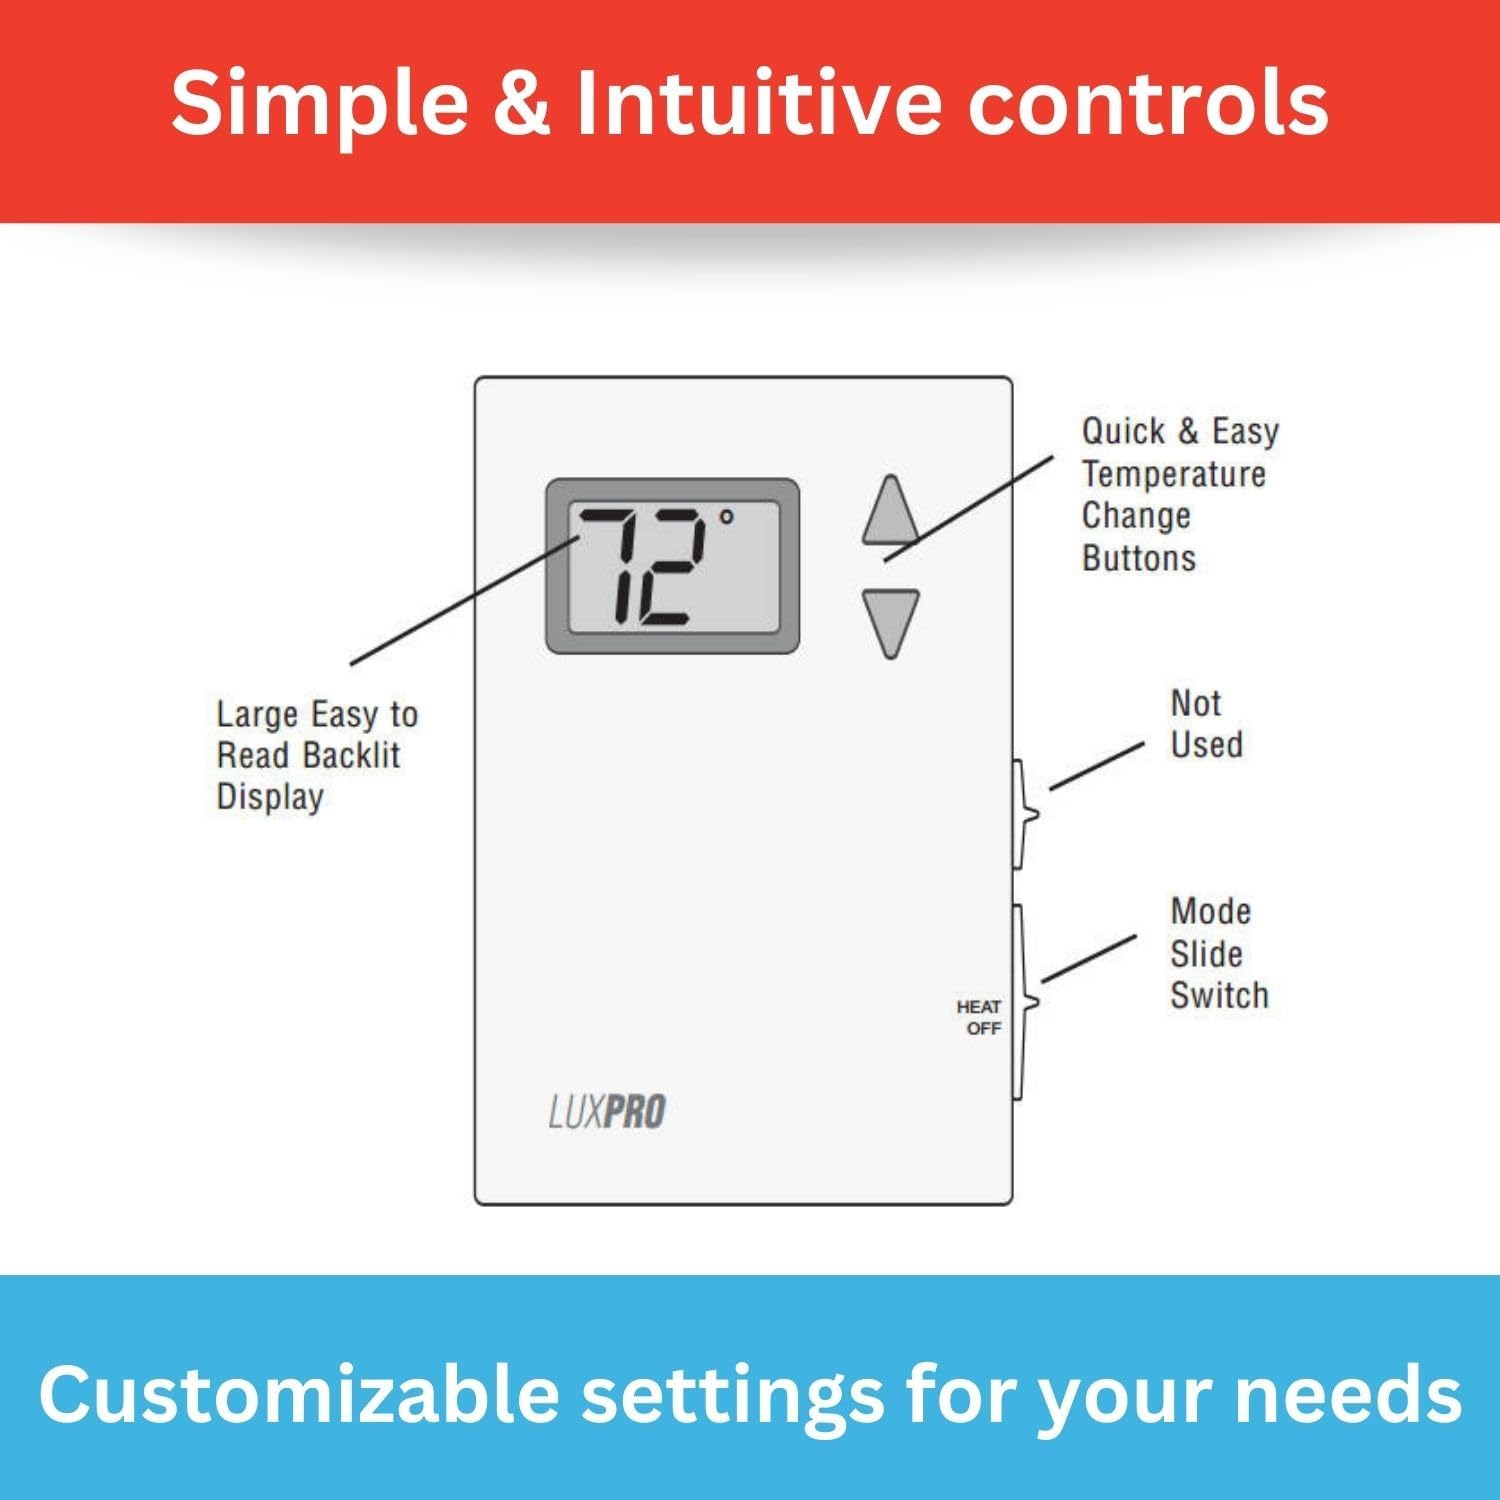
Slika 5.1: Diagram illustrating the controls of the LUX Pro PSD010B Thermostat, highlighting the large backlit display, quick and easy temperature change buttons (up/down arrows), and the Heat/Off mode slide switch on the side.
- Digitalni zaslon: Shows the current room temperature and the set temperature. It is backlit for easy reading.
- Gumbi gor/dol: Used to adjust the desired temperature setting.
- Mode Slide Switch: Located on the side of the thermostat. Select 'HEAT' for heating operation or 'OFF' to turn the system off.
5.2 Nastavitev temperature
Za nastavitev želene temperature uporabite Up or Dol arrow buttons. The display will show the set temperature as you adjust it, then revert to showing the current room temperature after a few seconds. The thermostat will automatically activate your heating system when the room temperature falls below your set temperature.
5.3 Izbira načina
Use the slide switch on the side of the thermostat to select the operating mode:
- TOPLOTA: Termostat bo nadzoroval vaš ogrevalni sistem, da bo vzdrževal nastavljeno temperaturo.
- IZKLOPLJENO: The heating system will remain off.
5.4 Fahrenheit/Celsius Selection
The thermostat allows selection between Fahrenheit and Celsius temperature display. Refer to the detailed specifications or the full manual for instructions on how to switch this setting, typically involving a button combination or a switch on the circuit board.
5.5 Adjustable Temperature Limits
The thermostat features adjustable temperature limits, allowing you to set a minimum and maximum temperature range. This prevents the temperature from being set too high or too low. Consult the full manual for instructions on how to configure these limits.
6. Združljivost sistema
The LUX Pro PSD010B thermostat is designed for specific heating systems. Please review the compatibility information below before installation.

Slika 6.1: A chart detailing the system compatibility of the LUX Pro PSD010B Thermostat. It is compatible with 2-wire Hydronic (Hot Water), 750 Millivolt, and Gas Fireplaces (24V). It is not compatible with Heat Pump Multistage, Radiant Ceiling Heat, Electric Baseboards, Heat Pump w/ Auxiliary Heat, Portable space heaters, 3-wire Hydronic (Hot Water), Gas/Oil/Electric Furnace - Multistage, Cool Multistage, Cooling only, Plug-in air conditioners, Heat Pump w/o Auxiliary Heat, Gas/Oil/Electric Furnace - Heating only, and Gas/Oil/Electric Furnace - Single Stage.
Compatible Systems (Heat Only - 24V or Millivolt)
- 2-wire Hydronic (Hot Water) systems
- 750 Millivolt systems (e.g., gas fireplaces, floor furnaces)
- Plinski kamini (24V)
Ni združljivo z
- Večnamenske toplotne črpalketage sistemi
- Sevalno stropno ogrevanje
- Električne podnožne plošče
- Toplotna črpalka s pomožno toploto
- Prenosni grelniki prostorov
- 3-wire Hydronic (Hot Water) systems
- Plinska/oljna/električna peč - Multistage
- Kul Multitage sistemi
- Sistemi samo za hlajenje
- Vtične klimatske naprave
- Toplotna črpalka brez pomožne toplote
- Gas/Oil/Electric Furnace - Heating only (if it requires a fan control)
- Plinska/oljna/električna peč - enojna Stage (if it requires a fan control)
7. Vzdrževanje
7.1 Zamenjava baterije
The thermostat is powered by two AA batteries. When the battery power is low, a low battery indicator will appear on the display. Replace batteries annually or when the low battery indicator appears to ensure continuous operation.
- Gently pull the bottom of the thermostat cover forward to release it from the base.
- Odstranite stare AA baterije.
- Vstavite dve novi alkalni bateriji tipa AA in pri tem pazite na pravilno polarnost.
- Snap the cover back onto the thermostat base.
7.2 Čiščenje
Zunanjost termostata očistite z mehko krpoamp krpo. Ne uporabljajte abrazivnih čistil ali topil. Izogibajte se neposrednemu pršenju tekočin na termostat.
8. Odpravljanje težav
| Težava | Možen vzrok | rešitev |
|---|---|---|
| Ni prikaza ali prazen zaslon | Prazne ali nepravilno nameščene baterije | Baterije zamenjajte z novimi alkalnimi baterijami AA in pri tem pazite na pravilno polarnost. |
| Heating system not turning on |
|
|
| Netočno odčitavanje temperature | Thermostat located near heat source/draft, or internal sensor issue. | Prepričajte se, da termostat ni izpostavljen neposredni sončni svetlobi, prepihu ali virom toplote. Če težava ne izgine, se obrnite na podporo. |
9. Specifikacije

Slika 9.1: A detailed list of features for the LUX Pro PSD010B Thermostat, including digital, non-programmable operation, battery power, temperature range of 40°F to 90°F, clean design, large backlit display, easy installation, F/C selectable display, 5-minute minimum run/off time, and adjustable temperature stop.
- Model: PSD010B
- Tip: Mechanical, Non-Programmable
- Združljivost sistema: 1 Heat Only (2-wire Hydronic, 750 Millivolt, 24V Gas Fireplaces)
- vir energije: 2 AA baterij (priložene)
- Temperaturno območje: 40°F do 90°F (4°C do 32°C)
- Vrsta zaslona: Digital, Backlit LCD
- Vrsta nadzora: Button Control (Up/Down arrows), Slide Switch (Heat/Off)
- Dimenzije: 1.13"D x 5"Š x 3.5"V
- Teža artikla: 0.4 funta (6.4 unč)
- voltage: 24 Volts (compatible with millivolt systems)
- Material: Plastika
- Vrsta pritrditve: Stenski nosilec
- UPC: 021079070107
10. Garancija in podpora
The LUX Pro PSD010B Thermostat comes with a 5-letna omejena garancija, ensuring reliable performance and peace of mind. For warranty claims, technical assistance, or further inquiries, please refer to the contact information provided with your product packaging or visit the official LUX webmesto.

Slika 10.1: The LUX Pro PSD010B Thermostat displayed with icons highlighting its key features: a backlit display, adjustable temperature limits, battery-only power, and a 5-year limited warranty.