
Uvod
The Learning Resources Gearbotics Robot Motorized Set provides a hands-on experience in constructing robotic models. This set includes 118 color-coded components, such as gears, cogs, and connectors, along with a motorized unit. Users can design and build robots capable of movement and sound production via a controller.
This manual provides essential information for the assembly, operation, and maintenance of your Gearbotics Robot Motorized Set. Please read these instructions carefully before use.

Image: The product packaging for the Gearbotics Robot Motorized Set, illustrating the assembled robot and its remote controller.
Vsebina paketa
The Gearbotics Robot Motorized Set includes the following components:
- 118 color-coded pieces (gears, cogs, connectors)
- Motorized unit with sound capabilities
- Krmilnik
- Robot head
- Grabber arms
- Kolesa
- Instruction booklet for building models
Opomba: Four AA batteries are required for the motorized unit and two AA batteries for the controller, and are not included in the set.
Postavitev in montaža
1. Namestitev baterije
- Locate the battery compartment on the motorized unit and the controller.
- Z majhnim izvijačem (ni priložen) odprite pokrov predalčka za baterije.
- Insert four (4) AA batteries into the motorized unit, observing the correct polarity (+/-).
- Insert two (2) AA batteries into the controller, observing the correct polarity (+/-).
- Namestite pokrova predala za baterije in ju pritrdite z vijaki.
Pomembno: Vedno uporabljajte nove baterije iste vrste. Ne mešajte starih in novih baterij ali različnih vrst baterij. Če izdelka ne boste uporabljali dlje časa, odstranite baterije.
2. Začetna montaža
The Gearbotics set is designed for creative construction. Refer to the included instruction booklet for detailed steps on building specific robot models. The general assembly process involves:
- Connecting Base Components: Begin by connecting the main structural pieces using the various connectors.
- Integrating Gears: Attach gears and cogs to create rotational movement. Ensure gears mesh properly for smooth operation.
- Attaching the Motorized Unit: Securely connect the motorized unit to the robot's structure, ensuring its output shaft aligns with the gears intended for movement.
- Dodajanje dodatkov: Attach the robot head, grabber arms, wheels, and other decorative elements as desired or as instructed by the model guide.

Image: A fully assembled Gearbotics robot, showcasing its transparent gears, cogs, and structural components.
Navodila za uporabo
Once your robot is assembled and batteries are installed, you can begin operation using the controller.
- Ensure the motorized unit is securely connected to the robot and its power source (batteries).
- Use the directional controls on the controller to make the robot move forward or backward.
- Activate the sound function via the designated button on the controller to hear the robot's sounds.
- Experiment with different gear configurations and robot designs to observe varied movements and functions.
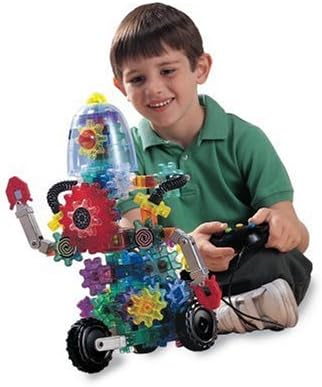
Image: A child interacting with the Gearbotics robot, using the remote controller to activate its functions.
Vzdrževanje
Proper maintenance ensures the longevity and optimal performance of your Gearbotics set.
- Čiščenje: Komponente obrišite s suho ali rahlo navlaženo krpoamp cloth. Do not immerse the motorized unit or controller in water. Avoid harsh chemicals.
- Shranjevanje: Store all pieces in a clean, dry place away from direct sunlight and extreme temperatures.
- Vzdrževanje baterije: Remove batteries from the motorized unit and controller if the set will not be used for an extended period to prevent leakage.
- Pregled komponente: Periodically inspect gears and connectors for any signs of wear or damage. Replace any broken or worn parts to maintain functionality.
Odpravljanje težav
If you encounter issues with your Gearbotics Robot Motorized Set, refer to the following common solutions:
- Robot Does Not Move or Motor is Silent:
- Check if batteries are correctly installed in both the motorized unit and the controller, observing polarity.
- Ensure batteries are fresh and fully charged. Replace if necessary.
- Verify that all connections between the motorized unit and the robot's gears are secure and properly aligned.
- Gears Do Not Turn Smoothly or Jam:
- Inspect for any foreign objects or debris obstructing the gears.
- Ensure all gears are correctly meshed and not forced into position.
- Check for any damaged or worn gear teeth that might prevent smooth rotation.
- Krmilnik se ne odziva:
- Confirm batteries in the controller are fresh and correctly inserted.
- Ensure there are no obstructions between the controller and the robot's receiver.
If problems persist after attempting these solutions, please contact Learning Resources customer support.
Specifikacije
| Funkcija | Podrobnost |
|---|---|
| Dimenzije izdelka | 15 x 5 x 14 palcev |
| Teža predmeta | 4.06 funtov |
| Številka modela | LER9188 |
| ASIN | B00004WGJS |
| Starost, ki jo priporoča proizvajalec | 6 leta in več |
| Potrebne baterije | 4 AA batteries (not included) for motorized unit, 2 AA batteries (not included) for controller. |
| Datum izdaje | 1. januar 2007 |
| Proizvajalec | Učni viri |
Garancija in podpora
For warranty information, replacement parts, or further assistance, please contact Learning Resources directly. Their official website or customer service contact details can typically be found on the product packaging or by searching online for "Learning Resources customer support".
Please have your product model number (LER9188) and purchase information available when contacting support.